That’s a really good question. Unfortunately it’s usually the wrong question to ask.
The right questions are:
What accuracy do I need?
How much effort is required to achieve that accuracy compared to alternative methods?
Why? Because photogrammetry can achieve almost any accuracy you desire, provided you make the pixel size small enough. Of course, if you make the pixel size smaller, you need more images to cover the same area, which means more effort is required — which is why the second question is important.
But how accurate can it be?
OK, there are circumstances where the limits to accuracy might be important, so in Part 1 we’ll look at a couple of examples to show what the limits actually are.
Fundamentally, there are limits to how small the size of a pixel on the surface on an object can be — you can’t see something smaller than the wavelength of light, and that’s about half a micron (depending on colour). This is why we have electron scanning microscopes instead of just making optical microscopes with stronger and stronger lenses. The smallest object pixel sizes we’ve used, with conventional lenses and normal cameras, have been 5–10 times larger than that.
The most accurate published result with our software is 5 µm in plan and 15 µm in depth, using a pair of 6 megapixel Canon EOS 300D digital SLRs with macro lenses. (More on “plan” and “depth” later.) That used an object pixel size of around 10 µm. The purpose was for measuring denture wear, so in that case the small area covered by an image with that object pixel size wasn’t a problem and the accuracy required was high.
Cuneiform Cone
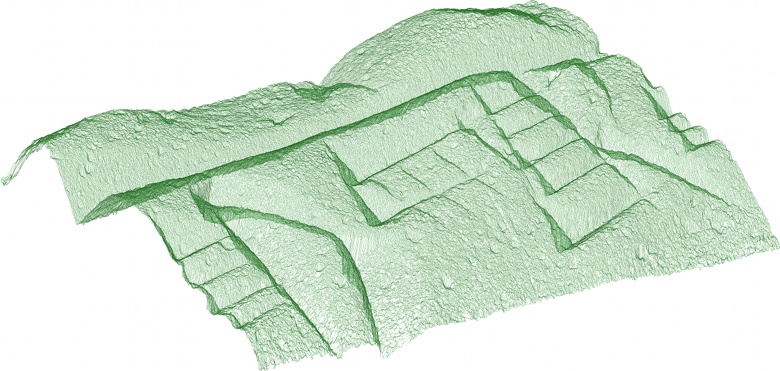
Another area where high accuracy and levels of detail can be important is in creating digital models of archaeological artefacts in heritage mapping like those shown below, where a 15 cm/6 inch high cuneiform cone was modelled. The first image shows a 26 mm × 14 mm portion of the cone’s surface model as a wireframe. The point density is just over 1,000 points per square mm:
The next image shows the base of the cone as a colourised point cloud:
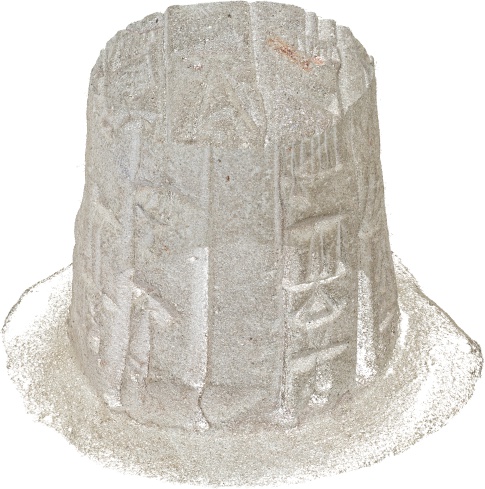
To “prove” that the point cloud was really a point cloud and not a textured mesh we had to render the point cloud at a high resolution and then resample it down to a lower resolution, so that the points would become smaller than a pixel in size and therefore a little “transparent”. Even rendered with a 50 µm pixel size, using one pixel to render a 3D point meant the surface was completely opaque because the average point spacing was 30 µm!
Finally, here we have the camera positions used to capture the cone. The cone was placed on a turntable and rotated while the camera was held stationary for each rotation of the cone. It looks like the camera is going around the cone because the data is shown in the cone’s reference frame. The green dots are points on the cone detected automatically by the software so it can determine the position and orientation of the camera at the time each image was captured:

$1 Coin
In this experiment, we captured a series of images with a 24 MP camera using a 100 mm macro lens from about 150 mm away.

The orthophoto we generated had a ground pixel size of 5 µm:

The average spacing in the final DTM was ~ 16 µm, or about 3,750 points per square mm:

We had no way of checking the accuracy of the generated DTM so the best we could do was capture two independent sets of images and process them separately, then compare the DTMs. The difference between them was 2.7 µm RMS.
The biggest challenge with these kinds of projects is actually the extremely narrow depth of field — it was impossible to get both the top of the coin and the surface that the coin was reseting on completely in focus at the same time with an aperture of f/8.
Conclusion
If you really do need detail and accuracy, and the area to be captured is not too large, then more than 1,000 points per square mm accurate to better than 15 µm can be achieved using inexpensive off-the-shelf digital cameras and lenses.
Otherwise, you need to estimate how much accuracy you will be able to achieve using a particular setup so you can minimise the effort required (by capturing as much area in each image as you can) while still being able to deliver the accuracy specified. In Part 2 we’ll look at how you can predict the accuracy of the data in a photogrammetric project and then give some real-life examples to illustrate the effort required.